The basics to catch the perfect photo
By Bobby Haven, Photographer, Videographer
June 01, 2021
These days, everyone is a photographer. Good quality digital cameras with fully automatic settings make it easy for the novice to snap a good image. Then there is the cellphone. The one accessory no one leaves home without has gone from a portable phone that could take a passable photo in a pinch to a really good quality camera that happens to let you make a phone call. All this technology has turned us into a society where nothing goes unrecorded. We’ve made a quantum leap when it comes to the ease of taking a photograph since the days of manual-focus/manual exposure cameras shooting on something called film.
All this said, there are still fundamental rules of photography that remain as essential to producing a quality image now as in the old days. A photograph is still an image created by light passing through an aperture (lens opening) at a certain speed, and recorded on a light sensitive media, be it film or sensor. It is up to the user to learn how to manipulate these settings to improve and or alter the final product.
We will get back to some of the fundamentals of proper exposure, but let’s start at the beginning - prepping for a photo shoot. Whatever your level of photography skill and the camera equipment you use, it’s always a good idea to run down a basic checklist ideally the day before a shoot.
First, determine what equipment to carry on your shoot. There’s a fine line between carrying too much equipment and not enough. While it is tempting to cover all your bases and carry all the gear you have, remember you will have to lug it all with you during the shoot, keep up with it, and hopefully not miss your shot while fumbling with too much equipment. It is important to put a lot of forethought into your shoot and fine-tune your camera equipment choices to meet the needs of the shoot. This includes ensuring lenses are clean, camera sensor is dust-free, and all batteries, including the spares you should be carrying, are fully charged. Will you be shooting in low light? Better make sure to pack the tripod. Taking prep work a step further, if I am planning to be out for several hours, I make sure I have a bottle of water and at least a granola bar in my camera bag side pocket.
Now that the equipment is ready, think about your light. Lighting is everything in a good photograph. Think carefully how the light is going to be falling on your subject the day of the shoot. Morning and afternoon light is generally the best time for most shooting. Noonday, directly overhead sun is harsh, casts bad shadows, and is usually frowned upon for good photography. Noon can work, but typically only if your subject is going to be in even shadows. There is also your subject to consider. If wildlife is your subject, research when your subject is going to be seen the best. If your subject will include the ocean or the local rivers, a quick check of the tide table is essential to know how much or how little water will be in the shot. Of course, checking the weather a day or so beforehand is extremely important.
Now let’s get back to camera settings. Most consumer-level digital cameras are designed for the casual or beginner photographer to put on total automatic and let the camera do the work. Fine. But to take it to the next level, the photographer needs to know a few basics. First, a proper exposure is made when light hits the camera sensor through the proper combination of shutter speed and aperture, or how much light is coming into the camera at what duration.
Too much light and too slow of a shutter results in an overexposed photo, while too little results in an underexposed photo. On cameras where the photographer can manually control exposure, it is handy to be able to increase or decrease the exposure the camera picks for certain results. The camera meter looks at the whole scene and averages out an exposure. Let’s say your subject is backlit. The camera will more than likely determine an exposure that will make the background look right, but will turn your subject into a silhouette. By increasing the size of the camera aperture, or decreasing the speed of the shutter, you can compensate for this and get a good exposure of your subject. Remember one important thing about photography – it is a give and take process. A change in one control will affect the other controls. Paying attention to your controls and practicing how they play off each other will up your photo game tremendously. Get to the point where it is an automatic instinct, and your chances of missing the right shot will drop.
While knowing proper exposure is a must to create the right photo, composition is just as important. If a photo is poorly composed, no one wants to look at it. It helps to think that when a person views a photograph, they are reading it, much like we read a page of type in a book. Your eye goes into the image, reads the content, then exits. And just like no one likes to read a jumbled page with too much content, no one wants to see a cluttered photograph. It is important to have a main subject and compose around that subject. There can be secondary subjects, but they should not overwhelm the main subject. If the main subject is a person, place them in the photo so that they are looking in or walking into the photo, not off the edge.
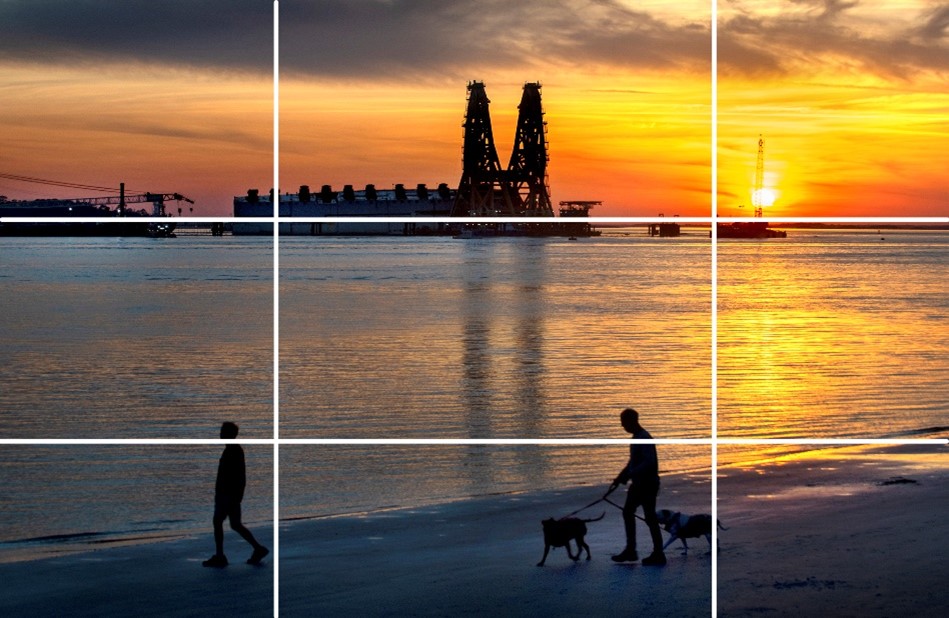
Placement of your subject is everything in composition, and as a general rule, you don’t want to place your subject directly in the middle of the picture. A basic and effective rule to follow in photography is the rule of thirds. Mentally break your composition up into thirds vertically and horizontally. Now try to place your main subject onto one of the four intersections. Always be mindful of your horizon. By placing your horizon line on the lower thirds of a horizontal composition, you are opening up the sky area and creating a more wide-open composition. By placing the horizon on the upper third, you are closing the composition in, and creating a wide-open space of land. With practice, this rule becomes automatic and you will be using it without even thinking about it.
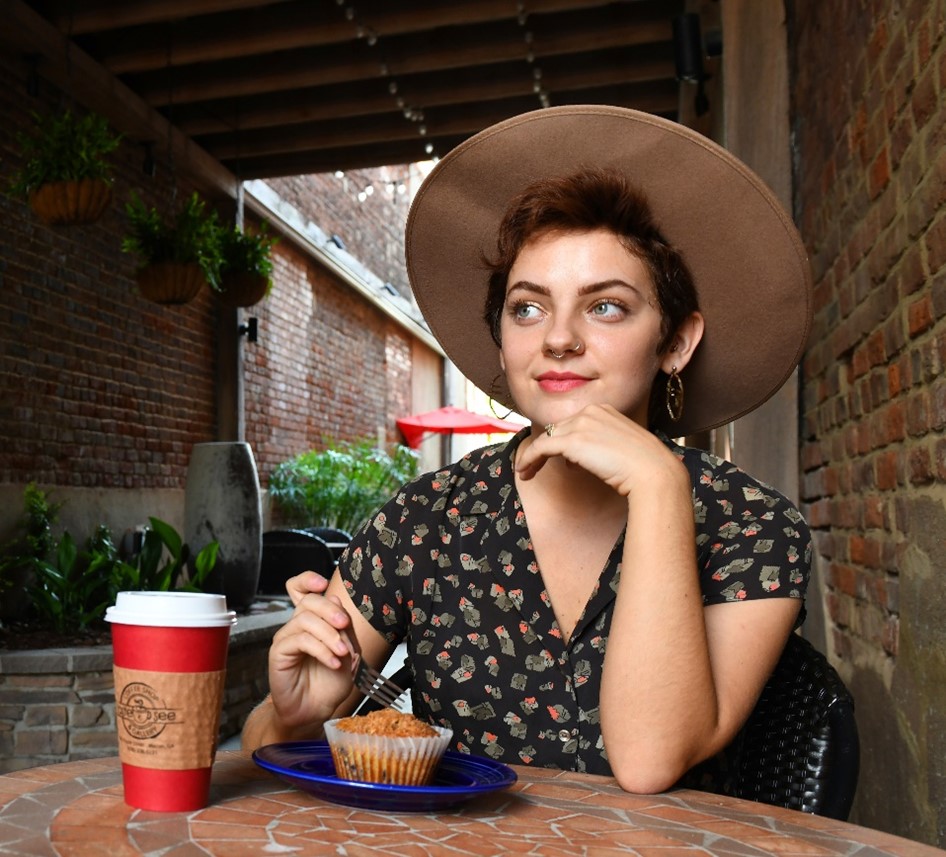
People enjoy seeing people in a photo. It’s human nature. Therefore, especially in a portrait, focus on the eyes.

Notice how the horizon line is in the upper third, and how the setting sun and 2 people on the beach land roughly on the intersections of the bottom thirds.

Notice the placement of the girl in this photo. Off centered, eyes in the upper right third of the composition. As your eye ‘reads’ this photo, it is taken straight to the girl’s eyes. Composition is clean, not any clutter, with the face framed by the roof and walls, keeping your attention in the picture.
Now you have it. Hopefully, this brief guide will give you the fundamentals of planning a successful photo shoot, or at least inspire you to get out and get snapping. Before closing, I would like to remind photographers to practice good photo etiquette when out in public with your camera. A big trend in photography these days is called street shooting, where a photographer walks the streets and snaps candid photos of people. While it is legal to photograph someone in a public place without their consent, I personally feel you should always ask permission before snapping someone’s photo. Not only is it the right thing to do, it may also keep you from getting into an altercation. I’ve seen too many articles on photographers beaten to a pulp for not asking permission before taking a photo. As a professional photographer, I always introduce myself and ask permission. Most times, people are flattered to have their picture taken once they realize you are legitimate. I also find that a quick conversation most times allows for more trust, and results in a better photo in the long run.


